

What is DMARC?

What if your best customers received a spam email with your company’s name on it?
Unfortunately, this scenario is quite common, and it’s a result of email spoofing — when scammers send emails while pretending to be someone else.
Domain-Based Message Authentication, Reporting, and Conformance (DMARC) is a security protocol that protects the sender reputation by giving you control over spoofed emails that use your domain.
Here’s a closer look at DMARC and how it prevents your organization from being impersonated.
How does DMARC work?
DMARC itself doesn’t conduct any new email verification. It just tells your email provider how to act based on the results of the SPF and DKIM, which both check the authenticity of a message.
Email authentication protocol checks (SPF & DKIM)
SPF is the first security check to ensure an email comes from an approved mail server for your domain. If the email doesn’t originate from one of the legitimate sources in the SPF record, it fails the SPF check.
DKIM then analyzes whether the email content itself has been tampered with. It looks for a special encrypted code in the email header that acts like a digital signature. This signature proves the email wasn’t modified during delivery. If the email’s signature doesn’t match the domain’s public encryption key, the DKIM check fails.
If the email passes both SPF and DKIM, it will be considered real and delivered to the inbox. But if it fails either SPF or DKIM, the email provider follows the rules in the DMARC policy for handling it.
More on the topic:
Action based on DMARC policy
Your DMARC policy states what your email provider should do with emails that fail SPF or DKIM. You can choose to monitor the email, block the fake email completely so it never gets delivered, or send it to the spam folder.
DMARC compared to SPF and DKIM
Here’s a comparison of DMARC, SPF, and DKIM, as well as the role each protocol plays.
| SPF | DKIM | DMARC | |
| Purpose | Validates the sender’s IP address | Validates the email’s content and connection with the sender’s domain | Tells what to do with emails that fail SPF and DKIM |
| How it works | SPF checks if emails come from an authorized server by comparing the sender’s IP against authorized IPs | DKIM uses cryptographic signatures to sign email parts. Receiving servers use the public DKIM key to verify emails weren’t altered | DMARC allows domain owners to set policies on how to handle emails that fail DKIM and SPF |
| Strengths | Prevents unauthorized servers from sending emails on behalf of your domain | Confirms that emails weren’t tampered with and that they come from an authorized domain | Prevents spoofing by requiring alignment between SPF and DKIM |
| Limitations | SPF only checks the return-path address, and can be bypassed by attackers who spoof the “From” address | DKIM doesn’t validate the “From” address or subject line by default | DMARC requires SPF and DKIM to be properly set up, and a strict policy can block good emails |
Why is DMARC important?
At this point, you might be wondering: “Isn’t this what spam filters are for?”
While basic spam filters do catch junk mail, they rely on basic spam signs like suspicious wording or links.
Here are some of the main DMARC benefits that make it an essential email security layer above a simple spam filter.
Higher email open rates
When SPF, DKIM, and DMARC aren’t set up correctly, your real emails could automatically get blocked, marked as spam, or delivered with warning messages by email providers.
If your email performance metrics start dropping unexpectedly, you should confirm that these protocols are in place.
When one of our clients had unexpectedly low open rates, this was the first thing we checked.
As it turned out, their email protocols weren’t configured correctly, which was why their open rates were 15% and dropping. After setting up SPF, DKIM, and DMARC with a fresh domain, their first-touch open rate rocketed to 80%.
Spotless brand reputation
Scammers are getting better at making phishing emails look real and convincing. Generative AI can generate hundreds or thousands of personalized phishing messages, leading to a massive 1,265% increase in phishing emails since ChatGPT was launched in November 2022.
With the right DMARC setup, you can ensure your customers won’t see an advanced AI-generated phishing attempt with your company’s name on it.
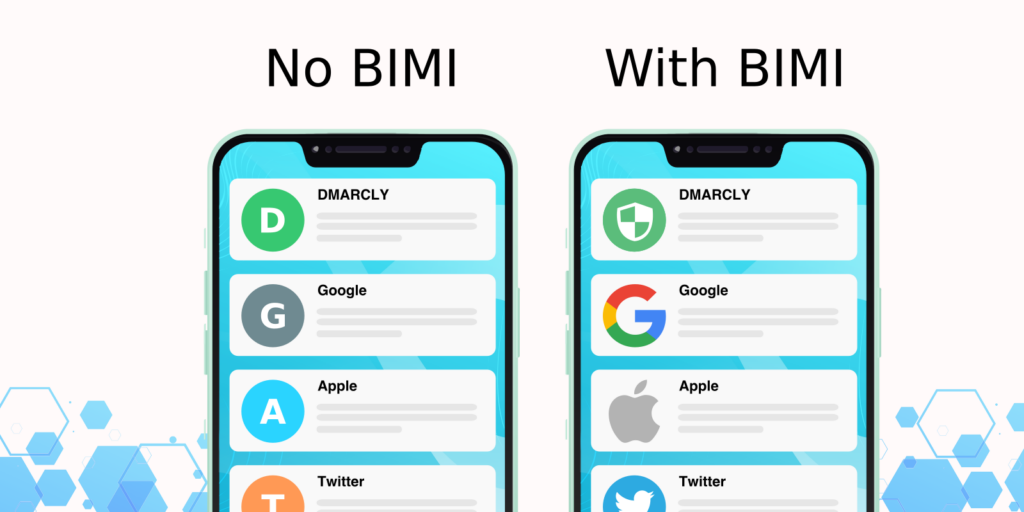
Improved trust with BIMI logos
Brand Indicators for Message Identification (BIMI) is a DNS-based standard that displays your verified logo in the email. It doesn’t authenticate the email itself. Instead, BIMI uses DMARC authentication protocols to verify that the message originates from your domain.
The BIMI process begins when you create a TXT record at default._bimi.yourdomain.tld in your DNS, which contains a URL to your logo (in an SVG format) and an optional certificate file. After sending the email, the receiving provider checks DMARC, DKIM, and SPF authentication results. Only mail legitimately associated with your domain can qualify for a BIMI logo.
Providers like Gmail require proof that you own the logo, which can be done through a Verified Mark Certificate (VMC) and Common Mark Certificate (CMC). Both are issued by authorized certification authorities, must be hosted securely over HTTPS, and help mailbox providers confirm the sender’s brand identity.
Aid for PCI DSS compliance
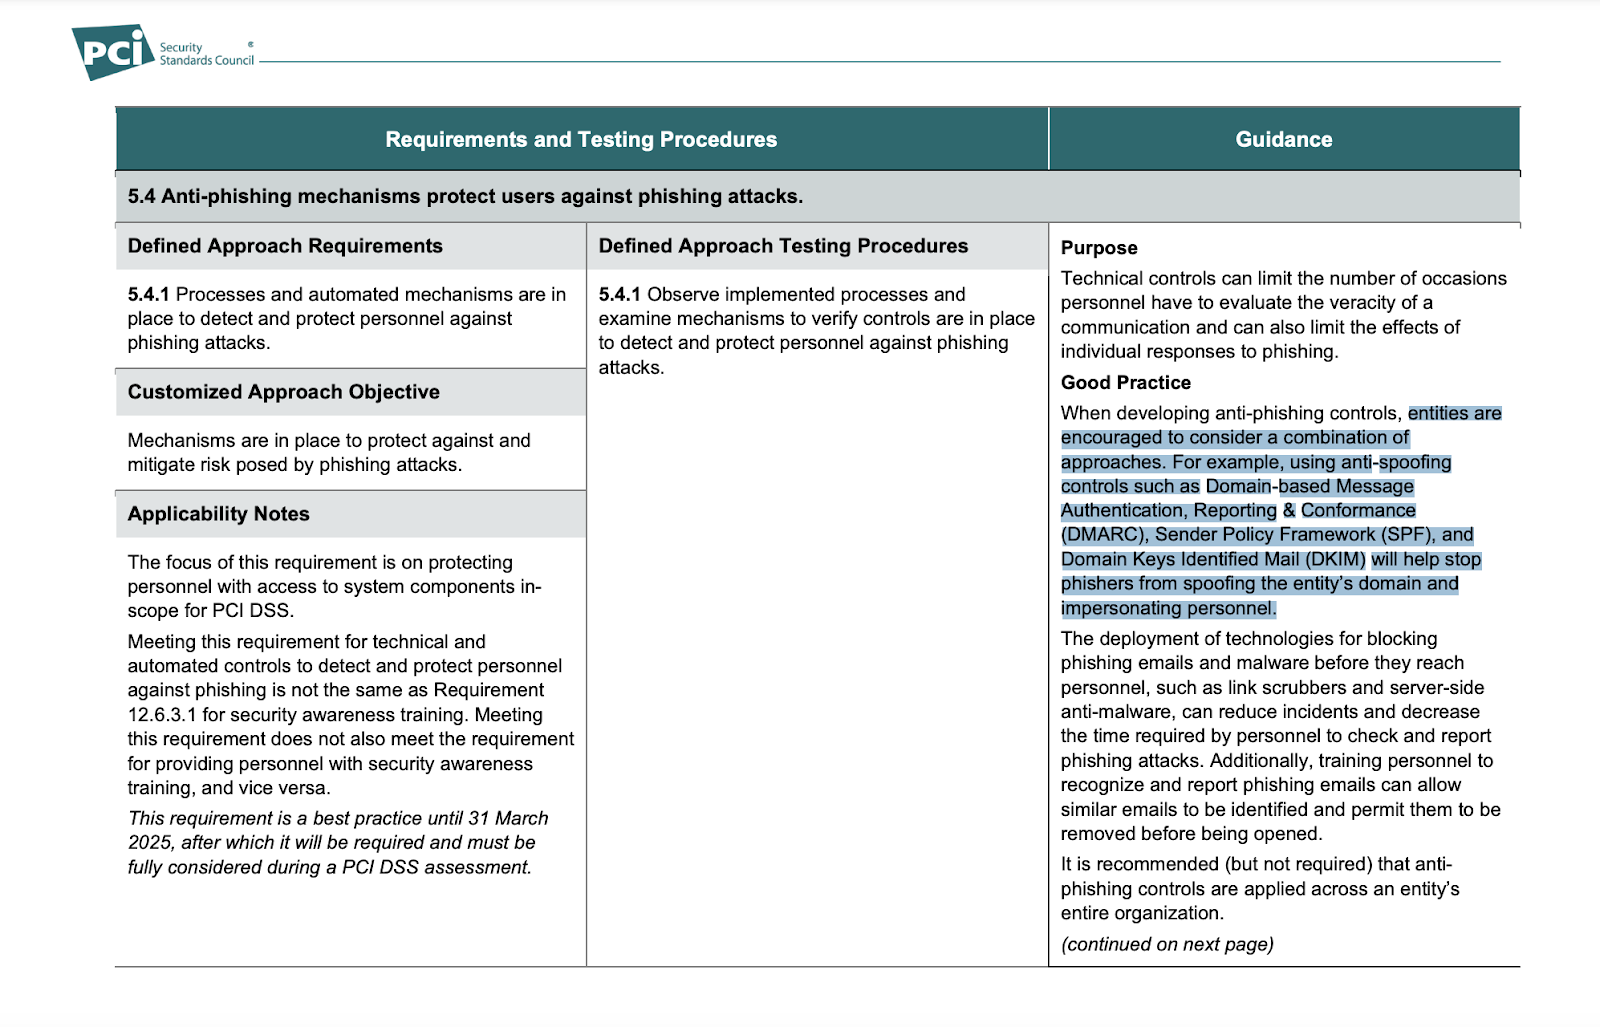
There are strict data rules for industries like healthcare, finance, and others that deal with private information.
While DMARC isn’t mandatory yet, PCI DSS recommends it as a good practice to keep your emails secure and protect sensitive data—which is actually a requirement from PCI DSS.
Overall cost savings
Think about how much it could cost if you do nothing — the costs of responding to incidents, fines from regulators, compensating customers, and more. The average global cost of a data breach in 2023 was $4.45 million, 15% higher than just three years ago.
Assistance with data privacy laws
Data protection laws such as the General Data Protection Regulation (GDPR) and the Health Insurance Portability and Accountability Act (HIPAA) do not explicitly require DMARC. It’s still mandated in other laws, like the Department of Homeland Security’s Binding Operational Directive 18-01.
Still, laws like GDRPR and HIPAA require risk-based safeguards to protect Personally Identifiable Information (PII). DMARC is simply an optional measure to meet those broader privacy requirements:
- Verifying that emails come from your domain makes it harder for attackers to impersonate your organization and trick users into revealing PII or PHI
- Blocking spoofed mail reduces the chances that sensitive data is exposed through fraudulent messages
- Authentication mail helps secure communication channels used for sharing personal or patient information
How does DMARC fit into email authentication and security?
When you send a company email from your app, the “From:” address is automatically set and locked to your account address. But technically savvy scammers have ways to connect directly to email servers and modify the “From:” field before a message is sent.
DMARC is an email protocol that allows you, as a domain owner, to set a policy regarding emails that only pretend to be sent from your domain. DMARC is the final security checkpoint after the Sender Policy Framework (SPF) and DomainKeys Identified Mail (DKIM).
Together, the DMARC, SPF, and DKIM email protocols create a triple layer of protection against spoofing and phishing. Reports from failed authentications provide insight into those attempts.
What does a DMARC record look like?
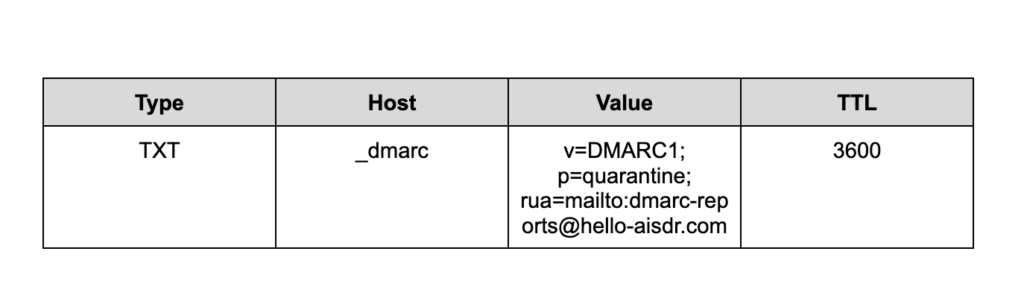
A DMARC record is a DNS text file stored at _dmarc.yourdomain. It instructs mail servers what you want to happen to emails that fail authentication.
The record follows a fixed tag-value format and is published through your DNS provider. The table below is an example using the domain “hello-aisdr.com”. You can copy the values directly when setting up your record, but don’t forget to change the domain in “Value” to your domain.
| Field | Value |
| Type | TXT |
| Host | _dmarc |
| Value | v=DMARC1; p=quarantine; rua=mailto:[email protected] |
| TTL | 3600 |
Here’s what tags and files in this table mean:
- v=DMARC1 states the DMARC protocol version
- p= defines the domain-wide policy for mail that fails DMARC alignment (more on that later)
- rua= specifies where to send aggregate DMARC reports (using mailto: addresses)
- ruf= tells where to send forensic or failure reports
- fo= controls when to request forensic reports
- pct= sets the percentage of messages the policy applies to (the default is 100)
- adkim= defines DKIM alignment mode to either s (strict), where signing must exactly match the domain, or r (relaxed), which allows signing via the subdomain
- aspf= defines SPF alignment mode to s or r
- sp= sets a specific policy for subdomains (uses p= policy if not set)
- ri= requests the reporting interval (in seconds) for aggregate reports
DMARC validation passes if either SPF or DKIM passes, but if both fail, the receiver applies the p= or sp= policy.
If you define reporting addresses (rua= and ruf=), the record will generate an aggregate or forensic report.
How DMARC reporting works: RUF and RUA
There are two kinds of DMARC reports: aggregate (RUA) and forensic (RUF).
RUA reports
RUA (aggregate reports) are periodic XML summaries. They are sent from receiving mail servers to the address in your rua= tag. They give a summary of email authentication activity, including information about the IP addresses (that sent mail from your domain), the number of messages, SPF and DKIM passes, failure counts, and applied DMARC policies.
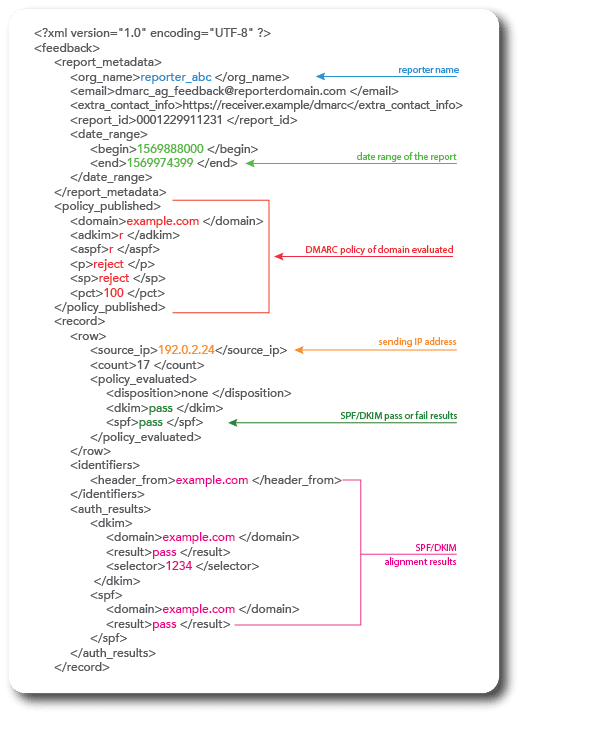
Most providers send these RUA reports, but you can request a different frequency using the ri= tag in your DMARC record. The key fields in the report include:
- report_metadata: the report sender, contact email, unique report ID, date range
- policy_published: the DMARC policy the receiver saw for your domain
- row.source_ip: the sender’s IP address
- Row.count: messages received within the reporting period
- policy_evaluated: the receiver’s action on those messages (disposition) and whether DKIM or SPF passed
- Identifiers.header_from: the domain in the visible From header
- auth_results: DKIM domain and selector that signed the message, and SPF domain that evaluated it
RUF reports
RUF (forensic reports) are near-real-time alerts in the Abuse Reporting Format for individual messages that failed DMARC send to the address in the ruf= tag. They include full message headers and a redacted body of the message.
Since RUF can contain personal data in the message body, many providers (like Gmail) don’t send them at all.
Let’s break down how DMARC policies operate based on this record.
Understanding DMARC policies: None vs quarantine vs reject
DMARC text file will enforce instructions defined by the policy (p= tag), which controls what happens to the unauthenticated mail.
There are 3 policies you can set up:
| Policy | Effect on failed emails | Pros | Cons |
| None: p=none | Delivers all messages but sends reports to addresses (in rua/ruf) | No delivery risk, complete visibility of failures | Offers no active protection against spoofing |
| Quarantine: p=quarantine | Flags failed messages as suspicious, sending them to the spam or junk folder | Blocks most spoofed mail from inboxes while allowing retrieval from spam | Some malicious messages still reach recipients, potential confusion if legitimate mail is quarantined |
| Reject: p=reject | Blocks all messages that fail DMARC from reaching recipients | Maximum protection from spoofing and phishing | Misconfigurations can drop legitimate mail |
All of these protocols and settings allow DMARC to check emails for authenticity.
How to set up DMARC
Since DMARC is a must-have for your email marketing, here’s a step-by-step guide to setting it up.
1. Identify your email sources
Start by identifying all the legitimate sources emails get sent from using your domain name.
Then you’ll need to make a list of email servers used internally in your company, marketing services like Mailchimp, and any other services that send emails on your behalf.
2. Configure SPF and DKIM
Next, publish the list of approved email sources in your domain’s SPF settings. Below, you can see the SPF settings for a domain and what each setting means:

For DKIM, you’ll need to create two encryption keys — public and private.
The public key should be published in your domain’s settings. The approved email sources you listed will use the private key to digitally “sign” all outgoing emails from your domain to prove they’re authentic.
Here is what the DomainKeys setup interface might look like:
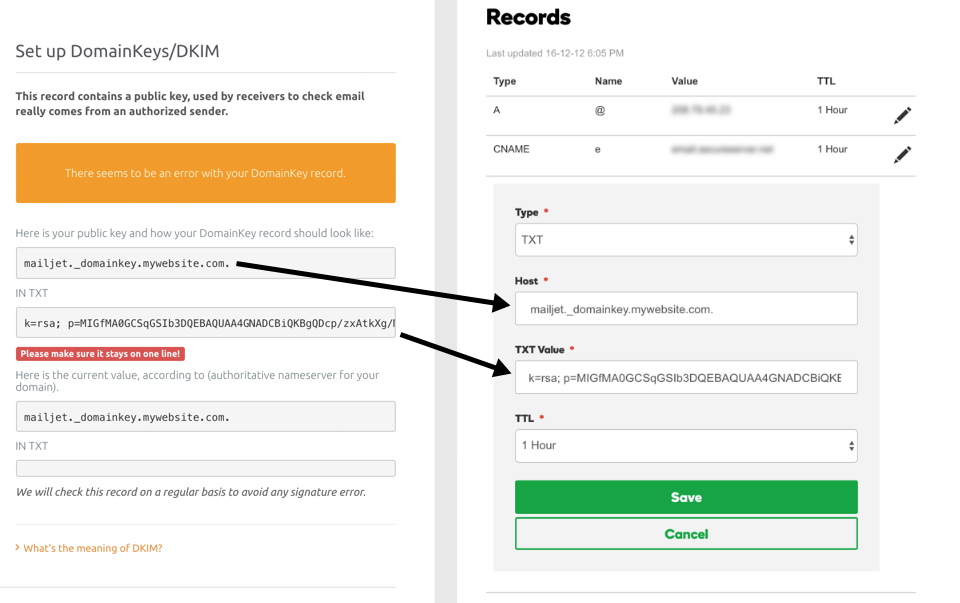
If SPF and DKIM aren’t set up correctly, your domain could be blacklisted and emails could land in spam.
3. Create a DMARC record with a specific policy
Your DMARC record is a text file that states what you want to happen to emails that fail authentication. There are three options, which you specify using the “p” tag in the text string.
- p=none: just monitor (report) failed emails
- p=quarantine: send failed emails to the spam folder
- p=reject: block these emails (do not deliver)
The table below is an example using the domain “hello-aisdr.com”.
You can copy the values directly since they are universal, but don’t forget to change the domain in “Value” to your domain.
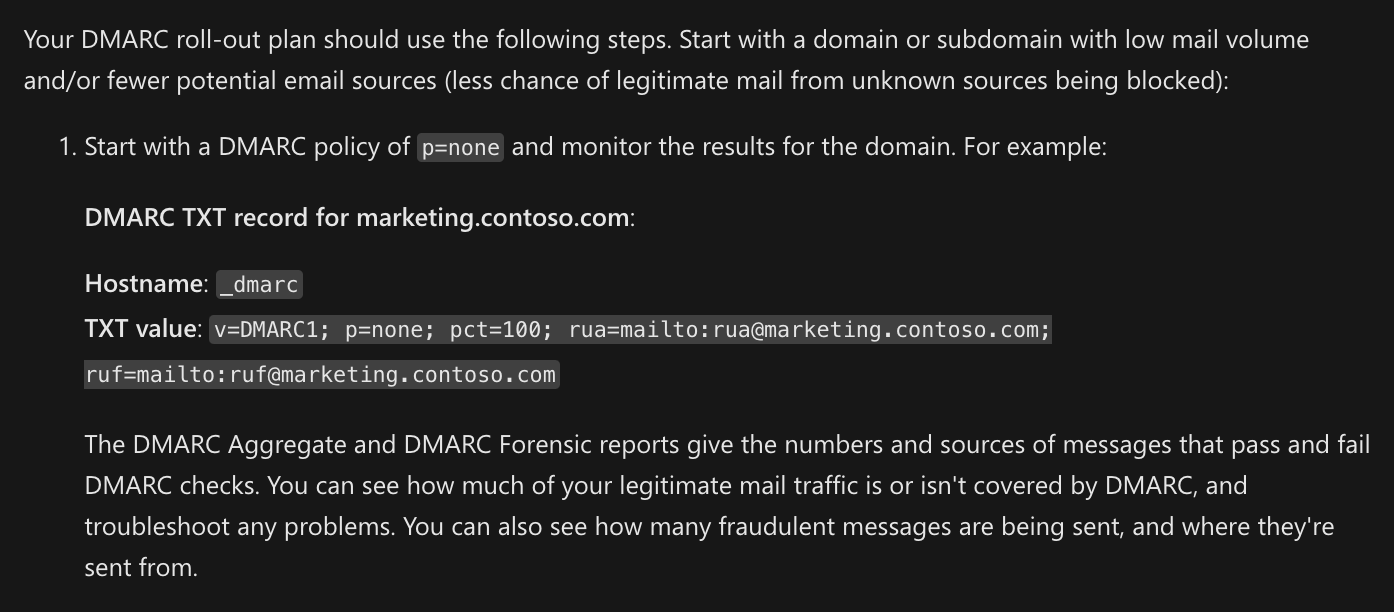
You might start with p=none to collect DMARC aggregate (rua) and forensic (ruf) reports without affecting delivery. You can then move to p=quarantine once you have verified that legitimate senders are passing authentication. Advance to p=reject after confirming there are no recurring alignment or configuration issues.
4. Publish the DMARC record in the DNS
After creating your DMARC record, you can publish it to your domain’s DNS. Email providers will then check the DMARC settings and follow the instructions for dealing with any emails trying to use your domain.
5. Adjust your DMARC policy as necessary
Some companies start by setting up DMARC just to monitor emails.
This mode doesn’t actually block email delivery. Instead, you get reports about any emails that failed authentication so you can investigate where they came from. Then you can update your email security practices based on the report results.
Here are the steps on how to start the monitoring mode. Specifically, the p=none policy indicates that no action will be taken should an email fail authentication.
Common DMARC errors and how to fix them
Even if you’ve set DMARC correctly, small issues may still hurt your domain or block legitimate email. Here’s how to spot and fix the most common problems:
Wrong policy timing
Setting the wrong policy can cause legitimate mail to be blocked en masse. Setting up aggressive DMARC policies (like p=reject) too soon magnifies authentication errors, leaving important messages to be rejected.
Fixes:
- Start with p=none and collect reports for at least a few weeks to identify every server and service sending on your behalf
- Switch to p=quarantine only when you can see in reports that all legitimate senders consistently pass SPF or DKIM alignment
- Move to p=reject when failures in reports come mostly from unknown or malicious sources
Incorrect RUA or RUF addresses
DMARC requires that the external domain publish an authorization TXT record (_report._dmarc.theirdomain.com) confirming they accept reports on your behalf. Receivers may refuse to send the reports if you attempt to send a poorly formatted report to an unauthorized third-party domain.
Fixes:
- Write the addresses in the rua or ruf tag as mailto:[email protected] (separate them with commas if you have more than one address)
- Third-party security vendors should create a _report._dmarc TXT record in their DNS to authorize receiving your reports
SPF failures
SPF can fail if your IP isn’t listed in the SPF record. It also fails if the SPF evaluation exceeds 10 DNS lookups (the RFC limit), with each include, a, or mx counting toward that limit.
Fixes:
- Add all mail senders to the SPF record in your DNS (such as include:_spf.google.com)
- Cut down on DNS lookups by removing old and unused systems from the SPF record
- Use SPF-flattening tools that replace include: references with direct IP ranges
DKIM misalignment
DKIM will fail if it’s not aligned (adkim= setting) with the From domain, has the wrong published key, or if signing is disabled. Besides, DMARC considers authentication a failure if SPF or DKIM passes without alignment to the From domain.
Fixes:
- Enable DKIM signing in every email service
- Check that the d= domain inside the DKIM signature matches the domain in your From address (strict mode) or is a subdomain (relaxed mode)
- For SPF, configure the sending service so the Return Path (also called the bounce domain) is within your domain
- For DKIM, ask the vendor to sign outgoing mail with your domain in the d= value
Subdomain gaps and missing policy
DMARC can produce an error if subdomains send mail through different systems and do not have SPF or DKIM.
Fixes:
- Publish SPF and DKIM records specific to subdomains that send your emails
- Add an sp= tag to your main DMARC record (like sp=quarantine) if you have unique DMARC rules for subdomains
Syntax errors
Only one DMARC TXT record can exist at _dmarc.domain.com. Extra records, typos, missing semicolons, or misplaced quotes can invalidate a record.
Fixes:
- Keep a single TXT record for _dmarc.yourdomain.com containing all your DMARC tags
- Use syntax checkers like MXToolbox’s DMARC Lookup to catch mistakes in DMARC records
- Delete unused DMARC records in DNS
Forwarding breaks SPF and DKIM
Forwarders whose IP is not listed in your SPF record may fail authorization. The same goes for forwarders that modify the message headers or body.
Fixes:
- Set up DKIM with strong keys for all senders so that DMARC can pass through DKIM even if SPF breaks
- Configure Sender Rewriting Scheme (SRS) so the forwarder rewrites the Return Path to an authorized domain
- Use ARC-aware email systems that evaluate the original authentication results and maintain trust after forwarding
Finding and fixing these problems is easier with tools made for DMARC testing.
Tools to test and monitor your DMARC
Several tools can help you verify your DMARC configuration, track authentication results, and identify delivery problems:
- EasyDMARC is a cloud-based platform that checks DMARC records for syntax and tags, and converts RUA reports into readable dashboards
- Mimecast’s DMARC Analyzer is a record checker service that ingests reports, identifies senders in your domains, and allows simulating different policies (without actually enforcing them)
- Google’s Postmaster Tools is a free service that helps monitor domain reputation, spam complaint rates, authentication passes, and filtering issues on Gmail and Google Workspace
- MXToolbox is a free DMARC record checker with spot-checking syntax and policy alignment diagnostics that help test all authentication layers
- BIMI Lookup Tool allows you to verify BIMI records for your domain, enabling it to display the brand logo correctly in authenticated emails
Testing and monitoring give you visibility into problems and weaknesses, but consistent updates and enforcement keep your domain truly protected.
Why set up DMARC?
DMARC lets you fight back against email spammers. As a result, you:
- Improve your email deliverability – Email providers look more favorably on domains implementing DMARC, meaning your legitimate messages get delivered properly.
- Increase brand trust – By blocking spoofed emails with DMARC, you can ensure that your customers and prospects never see a fake or malicious email claiming to be from your company.
- Save money – A proper DMARC setup will help you protect your company from non-compliance fines.
Book more, stress less with AiSDR

Explore the essentials of DMARC. Learn how DMARC can protect from domain from phishing and spoofing attacks
 Summarize with
 ChatGPT
 Claude
 Perplexity
 Grok
Grok 
 Google AI